Showing posts with label guild wars 2. Show all posts

16 August 2023

Guild Wars 2 WvW - True Camp Value - Part 2

It's been a long time, but I finally found the motivation and time to work down my list. Last time we looked at the true camp value based on the actual points camps produce in the Guild Wars 2's World versus World game mode. You can read up and refresh your knowledge over here. One of the follow-up topics I wanted to go over is the balance aspect, specifically whether or not one team's camps provide a significant advantage over the others.

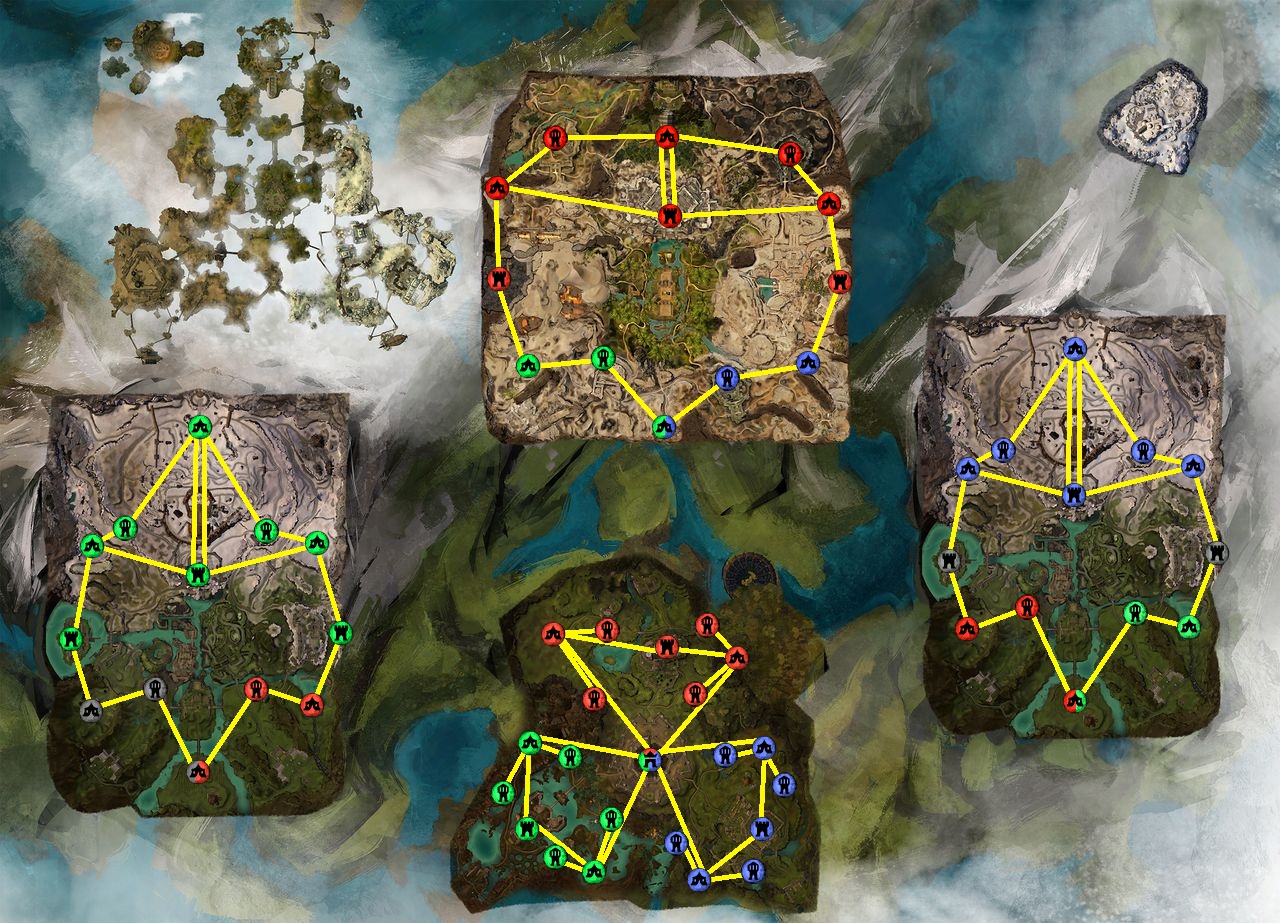
Answering this requires three equally strong teams. Environmental advantages are hard to quantify. Thus, to reduce complexity, we will assume that landscape plays no role. Under these circumstances, the teams will own structures by distance primarily. The resulting structure ownership will look like this:

Ill. 1: Guild Wars 2 World vs World Theoretical Objective Ownership in an equal match by GreenyNeko (Some graphical elements by ArenaNet)

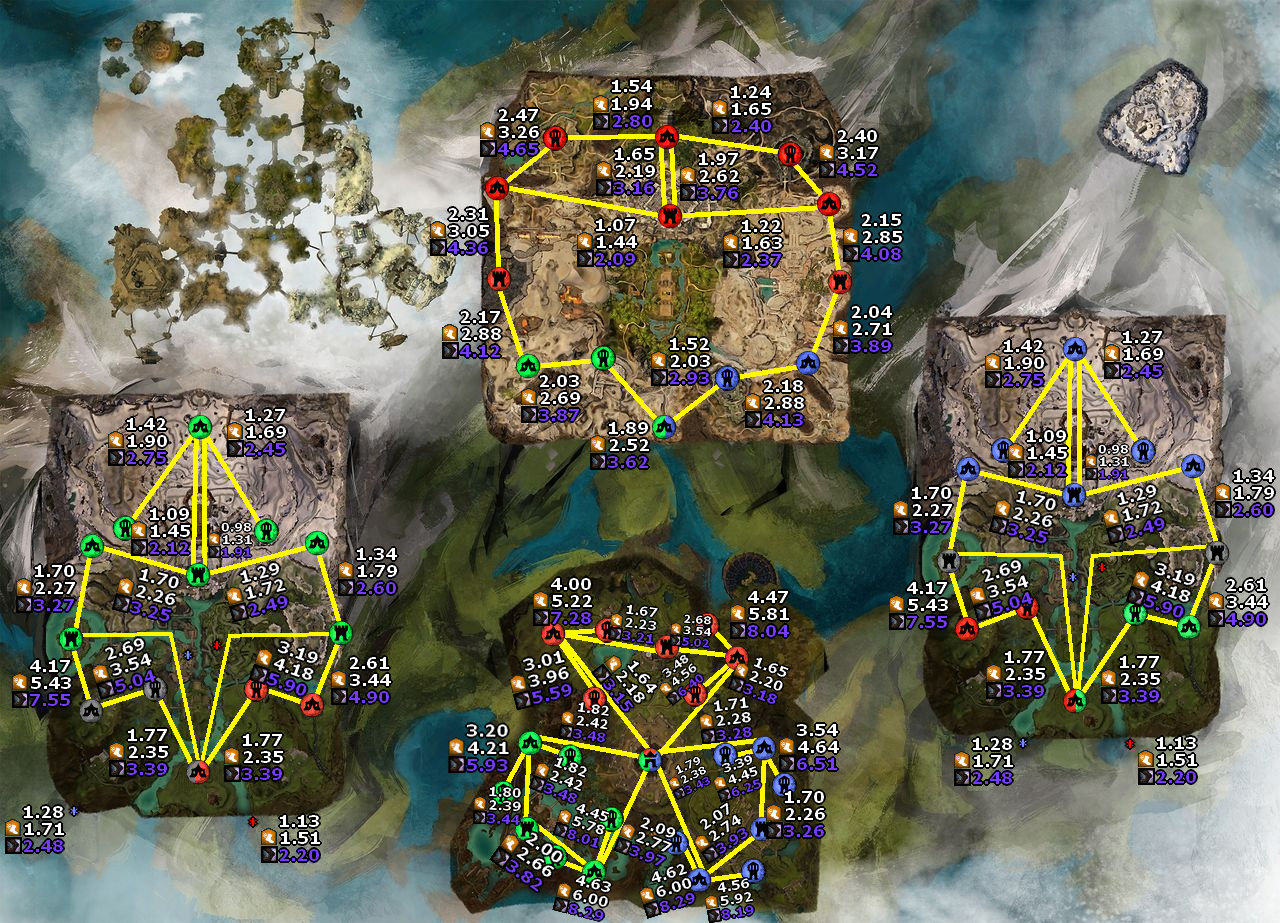
Notice that the map's owner typically conquers the bordering keeps due to increased priority. Now, we can calculate each camp's true value using our dataset. For this, we consider objects connecting to camps and their color. Applying the dataset yields the following result:

Ill. 2: Guild Wars 2 World vs World Dolyak Points Per 5 Minutes by GreenyNeko

We analyze the balance by summing each team's points from our setup. Shared objects yield a percentage of their points to each relevant team. We will use the unbuffed walking speed values because the speed multipliers become irrelevant and for consistency. The result is:

TeamTotal PointsDesertGreenBlueEternal
Green35.3322.97510.794.07517.383
Blue38.3552.943.57510.7921.05
Red41.56713.5074.0753.57520.41

We already see an advantage in the matchmaking system. As a reminder, we explained that matchmaking ranks servers from highest to lowest: green, blue, and red. The table reflects this, empowering the lower-ranked teams. The big question is whether or not this is confirmation bias, measurement errors, or fact.

To check this via the null hypothesis. We assume equal team points, and the difference is error based. Thus, the scores' average is close to the truth. Finding a significant deviation from the average disproves the null hypothesis confirming our previous supposition. For significance, we will use an alpha value of 0.05. The mean of the scores is (35.332+38.355+41.567)/3 = 38.418. Thus, we get the following deviations:
  • 1-35.332/38.418 = 0.0803 (8.03%)
  • 1-38.355/38.418 = 0.0016 (0.16%)
  • 1-41.567/38.418 = 0.0820 (8.20%)
Apparently, the difference is significant enough to consider it more than an error. Therefore, we conclude that the teams gain a significant advantage from Dolyaks d inversely proportional to their matching rank r. (d ∝ 1/r)

Lastly, I apologize for having taken so long. I needed more time and motivation to write between theses and seminar papers. Since I swapped to Lost Ark, I probably won't post about Guild Wars 2 for now. I hope you will continue to read my blog to learn about the kinds of stuff I present. :3

10 September 2021

Interactive Post: How Long Guild Wars 2 WvW Reward Tracks Take [Updated]

The post is now up to date with the 9th November patch! There's a comparison with the old system at the end.

With Elona neither being green nor dominating any matches, I couldn't finish the World versus World
(WvW) Dolyak research yet. However, I noticed an inaccuracy in Guild Wars 2 wiki's minimum WvW reward track time.

Screenshot of the World vs World Reward Track Tab
from Guild Wars 2 by GreenyNeko
What Are The World vs World Reward Tracks?

Players find the reward tracks in their tab in the WvW window. By playing WvW, they gain participation, determining how much reward track progress they get every 5-minute match tick. This table shows the progress given the variables.[2]


Map Tier 0 Tier 1 Tier 2 Tier 3 Tier 4 Tier 5 Tier 6
Core WvW Maps 0 25 60 95 125 160 195
Edge of the Mists 0 19 46 76 90 120 146

The following buffs further increase these:[2]

Buff Bonus
Guild Enhancement: World Reward Track 3-10%
Experience Booster 50%
Black Lion Boost 25%
Festival Gobbler Boost 25%
Celebration Bonus 10%
WvW Reward Track Enrichment 5%
Call of War 25%

The buffs sum up to 1.0+0.1+0.5+0.25+0.25+0.1+0.05+0.25=1.5 or 150%. Given that reward tracks need 20000 points, the wiki's supposed minimum estimate is 20000/(195*(1.0+1.25))*5=228 minutes or 3h 50m.[2]


The Discrepancy

But there are two more sources of reward track progress: Dailies and the skirmish reward track. Since a day has 24 hours and ticks happen every five minutes, we get (24*60)/5=288 ticks. Add that dailies awards players 3*250=750 progress[1] we gain 750/288=2.60 per tick.

The skirmish reward track gives players one to seven 25 point-rewarding-Instant Reward Track Progress. The amount and frequency depend on the player's skirmish track progress. More on it over at Guild Wars 2: Time Consumption of WvW Pips.[1]


First Interactive Post! Woooo!

With all the variables, I leave the selection to the reader, allowing them to choose the calculation and result of their interest.

Map

Boosts


Pips


Calculation

[1] Guild Wars 2

[2] https://wiki.guildwars2.com/wiki/WvW_Reward_Track

[3] https://en-forum.guildwars2.com/topic/104411-game-update-notes-november-9-2021/

22 July 2021

Guild Wars 2 WvW - True Camp Value - Part 1

I've decided to split my World versus World (WvW) research into two posts. I'll talk about how Guild Wars 2 and WvW works. Then explain what I wanted to research, why, and how. Lastly, I'll show the result using the desert map. The second post will contain the other results and the conclusion I drew from them. I still need time as I'm missing six transitions. In the meantime, let's get this post started.


Guild Wars 2 And World Versus World[1][2]

Image Showing The Results For Desert Borderlands
Ill. 1: Approximate Points Per Objective And Dolyak Path
With And Without Buffs ~GreenyNeko & WvW Intel
Guild Wars 2 is an MMORPG that allows players to play on different servers within a region. The server's choice barely plays a role in gameplay. In the game mode World versus World (WvW), however, these servers fight each other every week in a three-way match. Each server is assigned the colors red, blue, and green, given their rank. WvW contains four maps:

  • Desert Borderland for red,
  • two alpine borderlands for green and blue,
  • and the eternal battlegrounds shared by all.

While the borderland maps are biased to their color, the eternal battlegrounds aren't.


Score System[1][2]

The server with the most victory points wins. Servers get these given their war score at the end of a skirmish. There are many ways to get Warscore for the 84 two-hour-long skirmishes. For example, killing another player awards two to five points depending on the buffs. Every five minutes, the game also awards Warscore for each owned object. Type and rank determine the amount, as shown in the following table.

Type Base Secured Reinforced Fortified
Camp 2 3 4 5
Tower 4 6 8 10
Keep 8 12 16 20
Castle 12 18 24 30

Lastly, the game awards one Warscore when an enemy's Dolyak dies or when your Dolyak arrives at its goal. Dolyaks start at a camp and walk to nearby towers and then to nearby larger settlements if a server owns these.

It is similar to owning a street in monopoly, gaining a bonus for the whole alley. That raises the question, how much the bonus is worth and how it compares between the servers.


Approach And Difficulties

To answer these, we must study the Dolyaks in their natural habitat. Specifically, we need to know Dolyaks' speed with and without buffs With this data, we can estimate the time of buffed Dolyaks. Next up, we have to measure how long it takes a Dolyak to reach its destination. It's exhaustive to get this data as the other servers try to conquer as much as possible. Additionally, they try to kill you and the Dolyak you watch. However, your team can screw up your data too by giving swiftness or superspeed to the Dolyaks, giving inaccurate measurements.


Researching Dolyaks

I've already measured the Dolyaks movement speed in an earlier post. So, the next step is to measure how long they travel from their camp to each objective. I used the program Livesplit for this, which speedrunners commonly use for timing speed runs. When the Dolyak spawned, I started the timer and stopped it when the "war score" marker appeared once the Dolyak reached its goal. With the data gathered, we now need to look at two different cases. When the camp and tower are ours but not the keep or castle, the Dolyak will continuously run between the two conquered objectives. However, if we own all three objectives, the Dolyak will despawn after reaching its goal and respawn about seven seconds later. Next up, we get math involved.


Finalization And Representation

By dividing the point we get through the time it took the Dolyak to arrive there, we get the Dolyak's points per second. We can multiply this by five (5*60=300) to compare to objectives. For the visuals, I've linked the camp with the Dolyaks end goal. Now, for visualizing the data, I'm going to mark the objectives with white-filled black circles.  Then I link the camp where the Dolyak starts with its end goal. Lastly, I add the score objectives and Dolyaks give. We can see the result in the illustration for the desert borderland.


For The Future

Once I have gotten all data, I'm going to write the second post. Until then, this has to suffice. Oh, I'll also write the conclusion in the second post. When will it come? Once, WvW is going well enough for me to get the data.


[1] https://wiki.guildwars2.com/wiki/World_versus_World

[2] Guild Wars 2 - ArenaNet


19 October 2019

Guild Wars 2: Annual Halloween Without Procrastination

I've made sure to check my blog, and I came to a conclusion... I didn't make a procrastination post about Halloween in Guild Wars 2. I guess I didn't do it last year because I already completed most achievements. I don't like the incompleteness of the procrastination posts. Hence why I'm doing this one.

The Same Procedure As Every Time

Screenshot of the Mad King's
 Labyrinth Lobby
of Guild Wars 2 (Halloween 2019)
The festival itself doesn't matter for the procedure. We need to answer two questions: How long does the event go? Which achievements do we need to do, and what does it require us to do? To answer the first question, we can look up the blog post from ArenaNet. According to it, the event goes from the 15th of October to the 5th of November.[1] That's about 22 days. By now, it's already the 19th of October, though. So, from today on, it is 18 days instead. With the frame of time being clarified, let's look at the task. There are ten annual achievements from which nine need to be done. These are:
  • Arguably Foodlike - eat 300 candy corn
  • Ascent to Madness - defeat the mad king
  • Ancient Grudge - kill 100 minions of Joko
  • Courtly Service - spend 5 gold at the Labyrinth NPC
  • Pumpkin Carving - carve 100 pumpkins
  • Mad King's Clock Tower - jump through 3 times
  • Lunatic Racer - complete the labyrinth race 3 times
  • A Royal Tradition - Play the Mad King Says 3 times
  • Raceway Regular - complete 15 race track rounds
  • Masters of the Labyrinth - kill all 3 labyrinth bosses

Calculate the Daily ToDo

If this isn't the first procrastination post you've read, you should be able to do it yourself, haha. Basically, we divide the amount we need to do through the number of days we have. This will give us a daily amount, which may need to be rounded correctly. Following this using the Arguably Foodlike achievement, we will calculate 300 / 18 = 16.66... Of course, we can't eat less than one, so we round up to 17 (even if it would've been less than 0.5).  Here are the results for all of the annual achievements:

Achievement Total amount Daily amount
Arguably Foodlike 300 300 / 18 = 16.67
Ascent to Madness 1 1 / 18 = 0.06
Ancient Grudge 100 100 / 18 = 5.56
Courtly Service 5 5 / 18 = 0.28
Pumpkin Carving 100 100 / 18 = 5.56
Mad King's Clock Tower 3 3 / 18 = 0.17
Lunatic Racer 3 3 / 18 = 0.17
A Royal tradition 3 3 / 18 = 0.17
Raceway Regular 15 15 / 18 = 0.83
Masters of the Labyrinth 3 3 / 18 = 0.17

Interpreting the Data

Now we have numbers that need to be interpreted, as given by the example before. This means, every day we would have to eat about 17 candy corn. We need to do the Ascent to Madness at least once (the calculation of this was unnecessary here). About 6 of Joko's subordinates need to be killed each day. We also would spend 28 silver each day, which is not possible as the lowest amount of money that can be spent is 1 gold. If we multiply the amount per day by four, we get 4 * 0.28 = 1.12 gold. This means we should spend 1 gold every 4 days. The pumpkins that need to be carved is equal to the Joko's minions we need to kill, which is ~6. The tower, labyrinth race, and "Mad King Says" need to be done 0.17 times per day, which is about once every 6 days (6 * 0.17 = 1.02). The raceway tracks in the special area require you to do 0.83 rounds every day. It makes much more sense to do three rounds, though. As such, we will do 15 / 3 = 5 runs instead. So, redoing the calculation we get 5 / 18 = 0.28 instead. So, we will be doing this too a little less than every 4th day (4 * 0.28 = 1.12).

Small Tips For Rounding When You Do It Yourself

If you calculate this yourself, make sure to round correctly in your interpretation. The amount you do daily should be rounded up. This is to make sure you get the total before time runs out. You will be done earlier, though, which is fine. However, when you round the frequency, you want to make sure the number decreases. If you do something every two days, you do it more frequently than if you do something every three days. This is important to make sure you will reach the total.

Your Mad King Says...Enjoy the Halloween event!
[1] https://www.guildwars2.com/en-gb/news/halloween-2019-is-getting-closer/

01 October 2019

Guild Wars 2: Strike Missions Introduce Players To Raids

Guild Wars 2 has released the first Strike Mission a few weeks ago. It belongs to a collection of instances, which are supposed to introduce players who have never done them before into raids.
Having seen this first instance, I'm a bit skeptical.

What Does The Strike Mission Provide?

Screenshot of Guild Wars 2
Preparing for the
Icebrood Construct Boss
The strike mission features the area that was played during the story. Lore wise it happens after the story without spoiling more than why you're in the area again in the presence. After the NPCs talking a cave entrance opens that lets you go through a tunnel. This tunnel features icy ground that lets you slide and a snowball rolling down as an obstacle. Past this tunnel, there is a jumping puzzle with a few chests. The ice physics from before are reused here. (and they do interact weirdly with gliding.)
Past the JP lies the boss.

The boss is also quite simple. It requires no tank and technically no healer. His attacks happen random and consist of impacts and ice waves that can be dodged or jumped. Additionally, he has an attack that fills 180 degrees of the arena with a swipe and a ground effect that deals damage over time. Another attack of his is the ice mines. Once he spawns them, they rotate around him. He often casts a wind that moves players along with it. Due to the opposite direction of the player and bomb rotation dodging them is usually required. Something easy to miss is an icicle attack he sometimes casts at a player position.

At 50% of health, the boss will go into phase two. In this phase, he uses two new abilities. Now he creates two to three (later on probably four) ice patches. These shoot out small bubbles that deal damage on hit. The way they spawn and move is very familiar for bullet hell games. After the projectiles stop spawning, tiny arrows highlight the ice to tell the player to get on. The boss will hit the one in front of him, producing a big wave that cannot be jumped over and is hard to dodge. The players need to stay on the higher patches and jump over it. The fight continues until the boss dies.

Reviewing The First Instance

Looking at the first strike missions already gives me a glimpse of where ArenaNet wants to start. The boss can be done with only damage dealers and features aside from dodging damage just one specific mechanic. This means it's planned for people who have at most killed a world boss or done a dungeon. If it were planned for people who run high tier Fractals of the Mists, it would have required a healer.

One of the biggest worries I have with this guy is, that people have so much damage in the group that mechanics are skipped. If the boss reappears later and the mechanic kills people instead of downing them if at all they will leave the mission with a bad taste. Overall, there is no incentive to learn all of the mechanics, which are thrown at the player.

The Complex Nature Of Raids

Raids are complex. Aside from requiring the player to figure out how to defeat the boss, there are mechanics layered upon mechanics. Each of these needs the raiders to react to and act on certain triggers. These can be...
  • visual: a telegraph, an animation, effect
  • auditory: a sound
  • or combined (using visual and auditory)
Additionally, raids are a multiplayer experience. This means players need to decide on how they will handle communication. (This does not require speech, though it simplifies communication by removing the requirement of typing.)

And then there are roles. Since bosses deal a lot of damage, some players need to switch to healers and tanks. More of them need to be given, depending on the mechanics and advantages of some classes (for example, supporters).

Raids are often seen as end-game content as they provide the player with challenges, where they can use everything they have learned during their MMORPG experience.

What Makes We Worry About Strike Missions

In game-design, you usually give the player one mechanic or system after the other. These are separated before being found layered. This is the best way to have the player learn these systems. This is actually done by ArenaNet at one or the other encounter. (for example, the guardians before vale guardian or the earth mini-boss before Adina) All of this is irrelevant if the players ignore mechanics. This means we need to teach figuring out the mechanics without frustrating or demotivating the player too much.

Giving invulnerability to the boss while the mechanic plays would be a good idea. However, this means the player stops what they're doing: Playing their class. Instead, it would make more sense to decrease the incoming damage the boss gets if a mechanic fails. (Keep in mind we don't wanna kill the player instantly for fails as this discourages too much). Now we just need to make sure, the boss performs the mechanic before dying.

Wrapping Things Up

I feel like this post has reached a decent size. I'm gonna write another one once the next Strike mission comes out until then I hope they will read this post or know what they're doing. Players need to learn that...
  • How do I heal?
  • What is tanking?
  • What is kiting?
  • What kind of things can I expect in raids?
And most importantly. Raids aren't hard, and they aren't just for hardcore players. With a decent difficulty curve, (nearly) anyone can learn to raid.

With that good night!


02 September 2019

My Stance On The Current Guild Wars 2 Drama

As Guild Wars 2 takes off most of my blog posts and I currently have time on my hands and can't record anything, because it's 2am... I want to take my stance on the whole Guild Wars 2 Announcement Drama that has been going on.

The Issue People Have

Reading a lot of comments on the big announcement, there's one theme that shows throughout all of the complaints. There was too much hype, and x or y did not get announced. I can understand that people who play a specific game mode, such as PvP or WvW haven't seen much content in the last months to years. Overall it would seem that Living World is the focus of updates while add-ons provided real content. It's now been 7 years of Guild Wars 2 with two add-ons and four living world seasons. Asking around my friends, I also found out that any content which is not released by an expansion pack is not considered as such. Well then, what did the announcement do wrong?

What Was ArenaNets Big Announcement?

People joke about the announcement not being a big thing. It covered a lot of topics, so that is a step up from Blizzard about the Diablo franchise. Though having new tournament seasons and mentioning that they're working on the WvW update - first of all - may not necessarily be news and secondly may not feature something new. Build templates show the same issue. This has already been announced, the only difference is that it will come soon instead of the future. The rest of the announcement - aside from merchandise, which I'm not gonna talk about - focused on the upcoming Living Story Season 5. The main event of the event so to say. The story will continue with the Far Shiverpeaks, another area that has been in Guild Wars 1 and as such is appreciated. There will be new masteries, that are gonna work differently, all the previous masteries will make a return and raid-like content as a bridge. The idea behind naming it Saga is a new policy to the updates or a new monetization concept. There's also more detail that is not relevant to the Drama. Such as Charr's background, Norn background, focus on respective characters, Jormag of course, and Scar makes an appearance.

Get To The Point

I think that's enough information for me to take my stance. Actually, there's not that much to say. If you look at the PR stunt of calling the season a Saga and them giving it such a big name, while at the same time not announcing an add-on would make it seem that the Saga is the add-on. The reason the name change was done is either a) due to a new monetization system or b) because they're gonna split the expansion into smaller updates such as the Living Story season updates. Of course, this is positive thinking. As such, the only thing that can be done is to wait for the first updates to see what ArenaNet means when they talk Saga. Maybe it's not as bad as you think. Anyways overall the announcement covered all or most topics of interest but was too ambiguous.

Additionally, ArenaNet mentioned this in 2015, and I agree with it even in 2019. A game dies with its community. Guild Wars 2 has a community, thereby it's not dead. Q.E.D.

Well, afterall, this is just my opinion. I'm not a fortune teller. Oh, wait, technically... Let's see if I guessed right.

Overhyping is an issue, I've seen multiple times. Since it makes me worry about certain games (e.g., Hytale), I should do a post about it.

27 August 2019

Guild Wars 2: Unlocking Ascended Cooking - Shopping List

In 41 minutes I'll be cook 500. So, in the meantime, I can write a post on what you need to unlock it yourself. I'm not gonna go into the details on how to level up to 500 the fastest or the cheapest, but this should help you get started and get an overview of what you need.

Divide And Conquer The Quest

Reaching a cooking level of 500 requires you to first reach level 425. After this Seimur - the cook who loves to add bloodstone dust to literally anything - will want to try your cooking at your home instance. This requires you to craft a specific item for him. This item will probably get you to level 435 or so. Next up, we have five quest lines for each race: Human, Norn, Charr, Asura, and Sylvari. For each of these, you need to craft three typical foods from each of those. After doing that you need to do stuff to improve your cooking. The human questline will have you improve your oven. This requires 3x Heat Stones and 5x Bloodstone Bricks. The Norn quest requires you to create cook utensils, which costs 5x Deldrimor Steel Ingots, 5x Dragonite Ingots and 1x Spiritwood Plank. The Charr one will unlock new meat drops to improve the quality of your meat by learning a new technique. This requires an event to be done and killing the corresponding enemies. For the Asura's, you will need to buy items that in total cost 15 gold. You will need to have done the Charr's before or buy the respective meat in the trading post. Lastly, through the Sylvari's, you will unlock the seed drops that are required to craft the ascended herbs. All you have to do here is gathering herbs until you get the varietal herb seeds, then craft a portable composter using 4x Spiritwood Plank and 1x Elonian Leather Square. Completing all these quest lines adds another 50 levels (10 levels for each) to your cook. With cooking 485 the last recipes, specifically the Bottle of Simple Syrup (1x Bag of Sugar and 1x Jug of Water), gives about one level per craft.

Summing The Materials Up

Here's the sum of what you will need:
  • Craft at maximum 25 dishes which reward experience and you have the most materials off.
  • Craft a Chef's Tasting Platter
  • Craft a Bowl of Snow Truffle Soup
  • Craft a Sesame-Roasted Dinner
  • Craft a Sage-Stuffed Poultry
  • Craft a Filet of Rosemary-Roasted Meat
  • Craft a Bowl of Artichoke Soup
  • Craft a Bowl of Poultry Tarragon Pasta
  • Craft a Bowl of Spicy Meat Chili
  • Craft a Plate of Lemongrass Poultry
  • Craft a Plate of Fire Flank Steak
  • Craft a Bowl of Roasted Lotus Root
  • Craft a Flatbread
  • Craft a Chocolate Omnomberry Cake
  • Craft a Bowl of Tropical Mousse
  • Craft a Bowl of Truffle Sautee
  • Craft an Omnomberry Ghost
  • 5x Deldrimor Steel Ingots
  • 5x Dragonite Ingot
  • 5x Spiritwood Plank
  • 1x Elonian Leather Square
  • 15 Gold
  • Items that are worth 15 more levels


Splitting each dish down into its ingredients we get this list:

  • 1x Artichoke
  • 1x Asparagus Spear
  • 8x Bags of Flour
  • 1x Bag of Starch
  • 6x Bags of Sugar
  • 4x Bay Leaves
  • 1x Bell Pepper
  • 5x Black Peppercorns
  • 1x Bottle of Rice Wine
  • 3x Bottles of Soy Sauce
  • 1x Bowl of Sour Cream
  • 1x Butternut Squash
  • 12x Carrots
  • 10x Cassava Roots
  • 2x Cayenne Peppers
  • 2x Celery Stalks
  • 1x Cheese Wedge
  • 3x Chili Peppers
  • 2x Chocolate Bars
  • 1x Coconut
  • 1x Cumin
  • 4x Eggs


  • 1x Eggplant
  • 2x Ghost Peppers
  • 3x Ginger Root
  • 6x Glasses of Buttermilk
  • 9x Heads of Garlic
  • 3x Jars of Vegetable Oil
  • 11x Jugs of Water
  • 2x Lemongrass
  • 1x Lime
  • 1x Lotus Root
  • 1x Mango
  • 1x Milling Basin
  • 5x Milling Stones
  • 1x Mushroom
  • 5x Omnomberries
  • 18x Onions
  • 1x Orange
  • 2x Orrian Truffles
  • 2x Packets of Baking Powder
  • 11x Packets of Salt
  • 2x Packets of Yeast

  • 1x Passion Fruit
  • 5x Pieces of Candy Corn
  • 1x Portobello Mushroom
  • 1x Potato
  • 1x Rice Ball
  • 4x Rosemary Sprigs
  • 4x Sage Leaves
  • 1x Sesame Seed
  • 2x Shallots
  • 8x Slabs of Poultry Meat
  • 5x Slabs of Red Meat
  • 4x Snow Truffles
  • 10x Sticks of Butter
  • 1x Tarragon Leaf
  • 5x Thyme Leaves
  • 4x Vanilla Bean
  • 1x Yam
  • 5x Deldrimor Steel Ingots
  • 5x Dragonite Ingot
  • 5x Spiritwood Plank
  • 1x Elonian Leather Square
  • 15 Gold
That concludes unlocking ascended cooking as well as reaching cooking 500.

Ascended Seeds

While I did mention that Bottle of Simple Syrup is a cheap way to get the last 15 levels. I would advise you to actually salvage foods you have crafted as well as lower-level food to get the Extracts of Nourishment. Use these to craft the Exquisite Extract of Nourishment. This can be used to craft the seeds for your home instance, which will also increase your crafting potentially.

24 July 2019

Guild Wars 2: Mount Speed

Which is the fastest mount? Well quite simple. The beetle when you move on the ground and the griffon if you can use it. Well, if you use the abilities. I've always wondered which is faster if you don't use your abilities. Also, some mount engage abilities have quite an insane forward motion. Lastly, to crown it all I already did a calculation on the movement speed and it would be interesting to compare that to the mount speed.

Procedure

Screenshot of the Gilded Hollow bridge in Guild Wars 2
To find these things out, as with most things we will need to find a place that fits our experiments and is measurable. You can compare this to the DPS benchmarks done by Guilds like Snowcrows, except that we're doing speed benchmarks instead of DPS. The velocity is calculated via the distance laid back in a certain time frame. The only way for us to measure the distance is by using the skills and abilities that have a radius given. To have accurate values we need a straight flat track with a clear start and a clear end. This turns out to be harder than one would expect. Back in the old post, I used the World vs World bridge, that's found south of the alpine borderlands. Unfortunately, it's not possible to use mounts aside from the Warclaw, so we need to find another one. The bridge in Lornar's Pass near Durmand Priory one of my ideas. It reaches a total of  4890 units. Another idea I had is the Guild Hall. If I could get the rights to build I could make myself a bridge that's as long as I want. That's when I saw that there was a bridge already in the Gilded Hollow. I went there first to measure the width and it turns out that from the stairs the entrance of the building is 7905 units. I couldn't come up with a longer bridge without building myself - which again would require the rights to build in a Guild Hall, which I don't have.

Screenshot showing the
small bumps on the Gilded Hollow
bridge in Guild Wars 2
Unfortunately, the bridge in the Gilded Hollow Guild Hall is not perfect. It does have a long-distance, it is straight there's a clear beginning and a clear end to use and it's flat. Well mostly, since it does have three small bumps in it. While these do not stop your movement directly they do have a tiny slow effect. Given this, our calculations do have a small inaccuracy. Testing this with walking results in hardly if any change of speed. Thus I'm gonna ignore it for these test cases. Another issue is the dive/flying ability of the griffon. I tried to use the high buildings near the bridge beginning pointing towards the middle of the Guild Hall and used Commander with markers on the map to determine the track and try to fly as accurately as possible. This turned out to be harder than expected so I would take the griffon results with a grain of salt. They may be accurate enough but there could be deviations of up to 0.50 seconds I would say.

The Actual Experiments

The actual experiments aside from those issues are quite simple. We move from point A to point B and whenever we move over point A or point B we respectively start and stop the timer. For the timer, I use my smartphone app again. keep in mind having to manually start and stop the timer results in a short delay due to the reaction time. I did not calculate in my own or the average human reaction time into the calculation so again values may vary by ~0.6 seconds or so. I performed this experiment on each of the eight mounts there are. Experiments were run on normal walk speed meaning not using the ability of the mount, Spamming or repeatedly mounting and using the engage ability and lastly using the mount ability and testing a few mechanics respective to it, such as double dive or the roller beetle speed after the boost.

The Result

I will represent the result in a table again. The table is sorted by time. Each mount has it's own color per row to allow an easy distinction which behaviors time belongs to which mount. The type of behavior is explained by the note. The time is given in seconds and milliseconds where one second is equal to 100 milliseconds. Calculation of the units per second is done by taking the bridge's length in units (7905 units) and dividing it through the measured time (e.g.4''21''') which will then yield the result (e.g. 7905u / 4.21s = 1877.67u/s). The m/s use the conversion of units to meters which is units multiplied by 2.52cm / 100 = 0.0252m. (e.g. 1877.67u/s * 0.0252m = 47.32m/s). I've omitted the conversion from u/s to feet/s to mph. I have also recalculated the walking speed with the mount name being "None" to be able to compare the mounts to the normal walking speed without boons.


Mount NameNoteTimeu/sm/skm/hmph
GriffonAbility (One boost)4''21'''1877.6747.32170.34106.26
GriffonAbility (Double boost)4''03'''1961.5449.43177.95111.01
RollerbeetleAbility4''72'''1517.2738.24137.6585.86
RollerbeetleRolling (After Ability)5''75'''1374.7834.64124.7277.80
GriffonAbility (flight)6''47'''1221.7930.79110.8469.14
RaptorAbility8''60'''919.1923.1683.3952.02
JackalAbility9''41'''840.0621.1776.2147.54
RollerbeetleEngage Spam10''06'''785.7919.8071.2944.47
SkyscaleAbility (Charge)10''31'''766.7319.3269.5643.39
SkimmerEngage Spam11''20'''705.817.7964.0339.94
JackalWalking12''65'''624.915.7556.6935.36
WarclawAbility12''80'''617.5815.5656.0334.95
GriffonAbility (Flutter)13''11'''602.9715.1954.7034.12
RaptorWalking13''18'''599.7715.1154.4133.94
SkyscaleAbility (Flight)13''27'''595.715.0154.0433.71
RollerbeetleRolling13''41'''589.4814.8553.4833.36
BunnyWalking13''72'''576.1714.5252.2732.61
SkimmerAbility14''00'''564.6414.2351.2231.95
SkimmerWalking14''37'''550.113.8649.9131.13
WarclawEngage Spam14''37'''550.113.8649.9131.13
WarclawWalking14''44'''547.4413.8049.6630.98
JackalEngage Spam14''71'''537.3913.5448.7530.41
RaptorEngage Spam15''33'''515.6612.9946.7829.18
GriffonWalking15''82'''499.6812.5945.3328.28
SkyscaleWalking15''87'''498.1112.5545.1928.19
GriffonEnage Spam16''37'''482.912.1743.8127.33
BunnyEngage Spam16''88'''468.3111.8042.4926.50
NoneWalking20''11'''393.099.9135.6622.25
SkyscaleEnage Spam20''15'''392.319.8935.5922.20
BunnyAbility22''15'''356.898.9932.3820.20

Conclusion

#1 Majestic Griffon
So, as you can see the griffon seems to be the fastest way of traveling if you can get one or two dive boosts in.
#2 Roadorolla-Beetle Da
The roller beetle is the fastest if you can't use the griffon and even after only one boost you have a decent constant movement. 
#3 Rapping Raptor
If both of these do not apply, the raptor is next on his third place. Though it comes short when you have to move uphill.
#4 Jackal with it's Portal
 Moving uphill I'd probably advise the jackal as it's ability is more dependable in an uphill scenario.

It's really awesome to see that using the roller beetle you could basically roll around the streets of some countries such as Germany. even though cities only allow 50km/h at maximum and the highway often has a limit of 100 or 120km/h. Then again if you had the mounts from Guild Wars 2 aside from some people sexting Asura's or whatever we would have portals and waypoints. I would definitely pay 1€ to teleport to university or work to port back for 1€. Worth it!

Oh, by the way. I heard there is actually 3rd party software that shows the current speed and you could basically take that. The thing is that from talking to someone who uses it the values might vary depending on the direction. Like for example a griffon with a downward motion has a faster vertical movement that gliding straight and some ground tracks you roll with your roller beetle aren't even or maybe you're in a curve or not moving straight. All these aspects can have an effect as you travel more distance in a zigzag than a straight line.

About Me

My photo
I'm a M.Sc. Games Engineer and I created this blog to share my ideas, theorycrafting, thoughts and whatever I'm working on or doing.