AAA Devs on Stop Killing Games
Are There Games That Comply?
game
(Disclaimer: Stop Killing Games does not intend and can't apply retroactively. These are examples to prove the point of feasibility.)
It's been a long time, but I finally found the motivation and time to work down my list. Last time we looked at the true camp value based on the actual points camps produce in the Guild Wars 2's World versus World game mode. You can read up and refresh your knowledge over here. One of the follow-up topics I wanted to go over is the balance aspect, specifically whether or not one team's camps provide a significant advantage over the others.
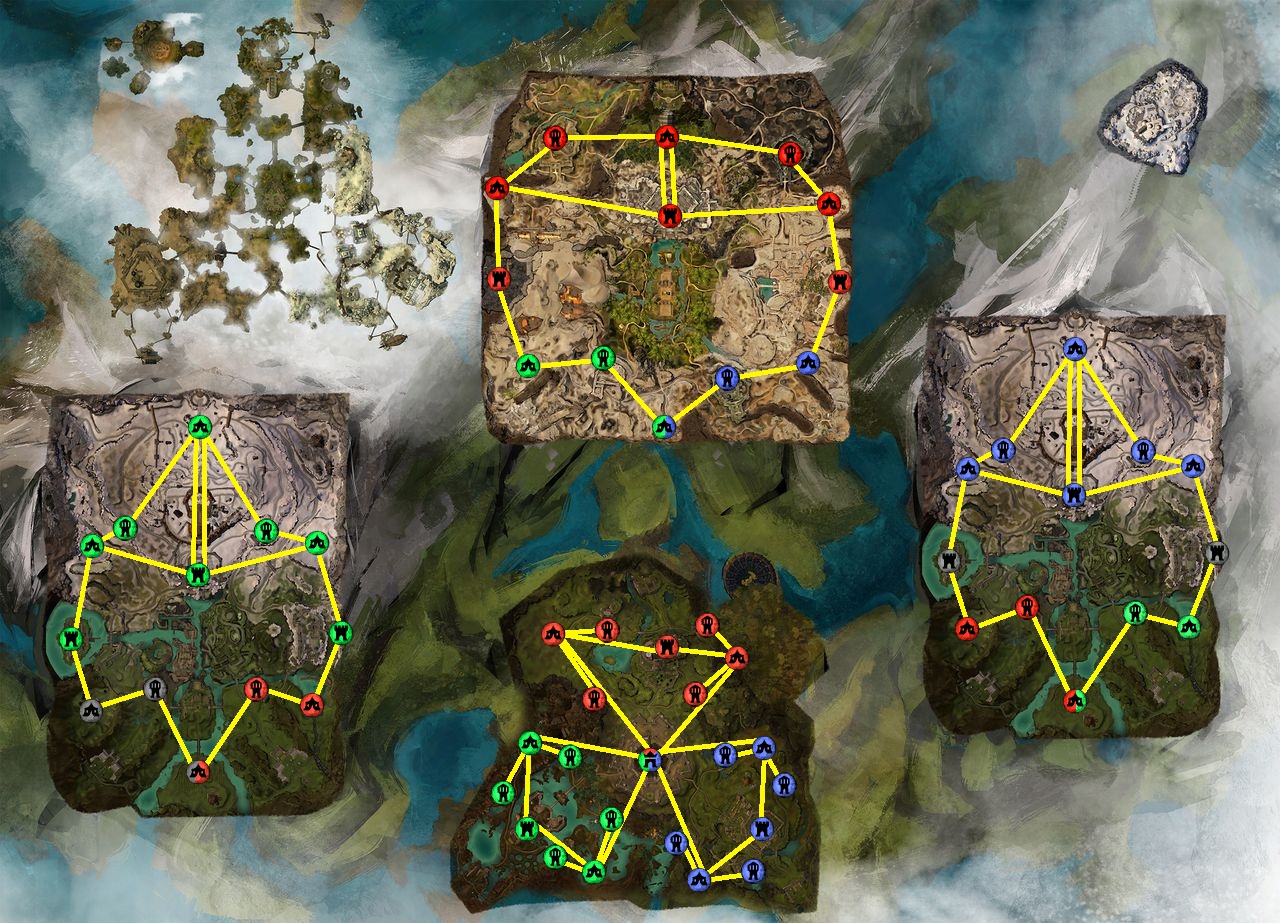
Answering this requires three equally strong teams. Environmental advantages are hard to quantify. Thus, to reduce complexity, we will assume that landscape plays no role. Under these circumstances, the teams will own structures by distance primarily. The resulting structure ownership will look like this:
![]() |
| Ill. 1: Guild Wars 2 World vs World Theoretical Objective Ownership in an equal match by GreenyNeko (Some graphical elements by ArenaNet) |
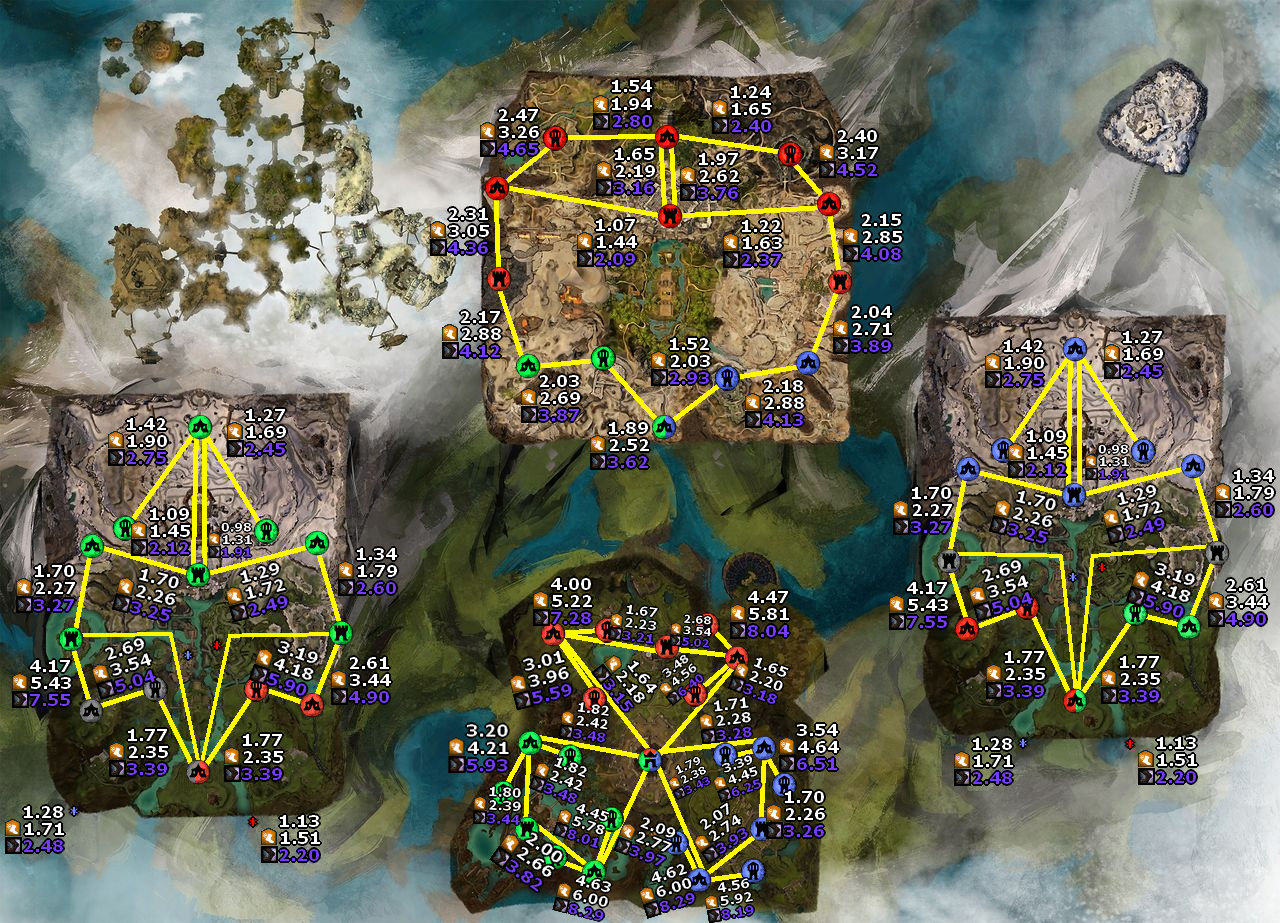
Notice that the map's owner typically conquers the bordering keeps due to increased priority. Now, we can calculate each camp's true value using our dataset. For this, we consider objects connecting to camps and their color. Applying the dataset yields the following result:
![]() |
| Ill. 2: Guild Wars 2 World vs World Dolyak Points Per 5 Minutes by GreenyNeko |
We analyze the balance by summing each team's points from our setup. Shared objects yield a percentage of their points to each relevant team. We will use the unbuffed walking speed values because the speed multipliers become irrelevant and for consistency. The result is:
| Team | Total Points | Desert | Green | Blue | Eternal |
| Green | 35.332 | 2.975 | 10.79 | 4.075 | 17.383 |
| Blue | 38.355 | 2.94 | 3.575 | 10.79 | 21.05 |
| Red | 41.567 | 13.507 | 4.075 | 3.575 | 20.41 |
The post is now up to date with the 9th November patch! There's a comparison with the old system at the end.
With Elona neither being green nor dominating any matches, I couldn't finish the World versus World
(WvW) Dolyak research yet. However, I noticed an inaccuracy in Guild Wars 2 wiki's minimum WvW reward track time.
| Screenshot of the World vs World Reward Track Tab from Guild Wars 2 by GreenyNeko |
Players find the reward tracks in their tab in the WvW window. By playing WvW, they gain participation, determining how much reward track progress they get every 5-minute match tick. This table shows the progress given the variables.[2]
| Map | Tier 0 | Tier 1 | Tier 2 | Tier 3 | Tier 4 | Tier 5 | Tier 6 |
| Core WvW Maps | 0 | 25 | 60 | 95 | 125 | 160 | 195 |
| Edge of the Mists | 0 | 19 | 46 | 76 | 90 | 120 | 146 |
The following buffs further increase these:[2]
| Buff | Bonus |
| Guild Enhancement: World Reward Track | 3-10% |
| Experience Booster | 50% |
| Black Lion Boost | 25% |
| Festival Gobbler Boost | 25% |
| Celebration Bonus | 10% |
| WvW Reward Track Enrichment | 5% |
| Call of War | 25% |
The buffs sum up to 1.0+0.1+0.5+0.25+0.25+0.1+0.05+0.25=1.5 or 150%. Given that reward tracks need 20000 points, the wiki's supposed minimum estimate is 20000/(195*(1.0+1.25))*5=228 minutes or 3h 50m.[2]
But there are two more sources of reward track progress: Dailies and the skirmish reward track. Since a day has 24 hours and ticks happen every five minutes, we get (24*60)/5=288 ticks. Add that dailies awards players 3*250=750 progress[1] we gain 750/288=2.60 per tick.
The skirmish reward track gives players one to seven 25 point-rewarding-Instant Reward Track Progress. The amount and frequency depend on the player's skirmish track progress. More on it over at Guild Wars 2: Time Consumption of WvW Pips.[1]
With all the variables, I leave the selection to the reader, allowing them to choose the calculation and result of their interest.
[1] Guild Wars 2
[2] https://wiki.guildwars2.com/wiki/WvW_Reward_Track
[3] https://en-forum.guildwars2.com/topic/104411-game-update-notes-november-9-2021/
I've decided to split my World versus World (WvW) research into two posts. I'll talk about how Guild Wars 2 and WvW works. Then explain what I wanted to research, why, and how. Lastly, I'll show the result using the desert map. The second post will contain the other results and the conclusion I drew from them. I still need time as I'm missing six transitions. In the meantime, let's get this post started.
![]() |
| Ill. 1: Approximate Points Per Objective And Dolyak Path With And Without Buffs ~GreenyNeko & WvW Intel |
While the borderland maps are biased to their color, the eternal battlegrounds aren't.
The server with the most victory points wins. Servers get these given their war score at the end of a skirmish. There are many ways to get Warscore for the 84 two-hour-long skirmishes. For example, killing another player awards two to five points depending on the buffs. Every five minutes, the game also awards Warscore for each owned object. Type and rank determine the amount, as shown in the following table.
| Type | Base | Secured | Reinforced | Fortified |
| Camp | 2 | 3 | 4 | 5 |
| Tower | 4 | 6 | 8 | 10 |
| Keep | 8 | 12 | 16 | 20 |
| Castle | 12 | 18 | 24 | 30 |
Lastly, the game awards one Warscore when an enemy's Dolyak dies or when your Dolyak arrives at its goal. Dolyaks start at a camp and walk to nearby towers and then to nearby larger settlements if a server owns these.
It is similar to owning a street in monopoly, gaining a bonus for the whole alley. That raises the question, how much the bonus is worth and how it compares between the servers.
To answer these, we must study the Dolyaks in their natural habitat. Specifically, we need to know Dolyaks' speed with and without buffs With this data, we can estimate the time of buffed Dolyaks. Next up, we have to measure how long it takes a Dolyak to reach its destination. It's exhaustive to get this data as the other servers try to conquer as much as possible. Additionally, they try to kill you and the Dolyak you watch. However, your team can screw up your data too by giving swiftness or superspeed to the Dolyaks, giving inaccurate measurements.
I've already measured the Dolyaks movement speed in an earlier post. So, the next step is to measure how long they travel from their camp to each objective. I used the program Livesplit for this, which speedrunners commonly use for timing speed runs. When the Dolyak spawned, I started the timer and stopped it when the "war score" marker appeared once the Dolyak reached its goal. With the data gathered, we now need to look at two different cases. When the camp and tower are ours but not the keep or castle, the Dolyak will continuously run between the two conquered objectives. However, if we own all three objectives, the Dolyak will despawn after reaching its goal and respawn about seven seconds later. Next up, we get math involved.
By dividing the point we get through the time it took the Dolyak to arrive there, we get the Dolyak's points per second. We can multiply this by five (5*60=300) to compare to objectives. For the visuals, I've linked the camp with the Dolyaks end goal. Now, for visualizing the data, I'm going to mark the objectives with white-filled black circles. Then I link the camp where the Dolyak starts with its end goal. Lastly, I add the score objectives and Dolyaks give. We can see the result in the illustration for the desert borderland.
Once I have gotten all data, I'm going to write the second post. Until then, this has to suffice. Oh, I'll also write the conclusion in the second post. When will it come? Once, WvW is going well enough for me to get the data.
[1] https://wiki.guildwars2.com/wiki/World_versus_World
[2] Guild Wars 2 - ArenaNet
![]() |
| Ill. 1: The approach to measuring velocity given crewmate vision ~GreenyNeko |
| Navigation to Weapons: | 0.307cv+0.074cv/2+0.218cv+0.144cv+0.189cv | = 0.894cv |
| Weapons to Cafeteria: | 0.116cv+0.125cv*2+0.237cv+0.198cv | = 0.801cv (guessing missing distances) |
| Cafeteria to Upper Engine: | 1.012cv+0.237cv/2+0.77cv | = 1.9005cv (including the button) |
| Upper Engine to Reactor: | 0.397cv/2+0.339cv+1/3*0.498cv | = 0.7035cv |
|
imagination artistic interests emotionality adventurousness intellect and liberalism
|
people higher in imagination use fantasy to spice up the ordinary life how much interest and appreciation a person has in art how much people are aware of and able to access their own feelings determines how much people avoid routines and explore or try out new things the interest people have in abstract ideas and thinking hard determining how likely people are to challenge convention and tradition |
Self-Efficacy Orderliness Dutifulness Achievement-Striving Self-Discipline Cautiousness | how confident people are in their ability of achievement describes people's organization and cleanliness determines a person's sense of duty and obligation defines how hard a person strives for accomplishments how self-disciplines a person is how careful people are on their decisions |
Friendliness Gregariousness Assertiveness Activity Level Excitement-Seeking Cheerfulness | is associated with how open people are towards others describes how much people enjoy the company of others and of how many assertive people take the initiative and lead determines how much people enjoy a busy instead of a relaxed life correlates to the interest in risks and thrills is associated with how strong people feel positive emotions |
It has the facets: Trust Morality Altruism Cooperation Modesty Sympathy | determines how much a person believes others are fair or good correlates with sincere and unguarded people behave towards others is how much people enjoy helping others is associated with the will of compromising or forfeiting on your needs for others describes how modest people are gives how much people can feel the pain of others |
The facets are: Anxiety Anger Depression Self-Consciousness Immoderation Vulnerability | defines how often and fast people become anxious or stressed is how fast or easy people get angry is the tendency to feel depressed determines how much people care about what others think is the ability to resist lust and cravings describes the ability to withstand stress |
| Openness +1 |
Conscientiousness +0 |
Extraversion +21 |
Agreeableness +10 | Neuroticism -8 |
| Imagination +12 |
Self-Efficacy -6 |
Friendliness +24 |
Trust +18 |
Anxiety -11 |
| Artistic Interests +5 | Orderliness +0 |
Gregariousness +22 |
Morality +21 |
Anger +0 |
| Emotionality +16 |
Dutifulness -6 |
Assertiveness +8 |
Altruism +0 |
Depression -16 |
| Adventurousness +0 | Achievement-Striving +13 | Activity Level +0 |
Cooperation -5 |
Self-Consciousness -24 |
| Intellect -22 |
Self-Discipline +13 |
Excitement-Seeking +13 | Modesty +3 |
Immoderation +12 |
| Liberalism -7 |
Cautiousness -29 |
Cheerfulness +16 |
Sympathy +5 |
Vulnerability +5 |
Last year I shared some creators that helped me learn about game development. This year I'm gonna pass on some life advice kind of. If you play certain types of games, listen to music, are a bookworm, movie aficionado, or a weeb listen up. This goes out to you.
The anime and manga "Dr. Stone" is an interesting example. In some chapters and one of the episodes, they mention the "100 Stories" that are passed on from generation to generation keeping important information.[1] Even better this is not made up. It actually matches up with real-life as well. Not only did Carl Jung research archetypes consciously or unconsciously hidden in stories, but we also tell our children stories that coincidentally have a moral. You might just do it as a bedtime story because you got one or two read for you or because you liked them but there's more reason for it. Whether it's teaching children not to take apples from strangers[2] or not to steal from others[3]. Another great example is the book "There's No Such Thing As A Dragon", which is also used by Jordan Peterson to illustrate this point. In this children's book, a dragon representing an issue is ignored within the household. Through the action of ignoring it, it grows bigger and bigger causing trouble all around until the family stops ignoring it and deals with it. This tells us not to ignore problems and solve them, else they might get worse and blow out of proportion.[4] Those are all children's stories though.
But, this is not limited to those. The bible is another example. It contains a lot of stories, instead of facts and you can learn from all of them. Whether it's questioning morals and decisions or showing what is righteous and what isn't. I would even go further to say this is also the case for animes. Seeing how a person has to struggles against being oppressed and abused in all kinds of ways[5], or people dealing with their own psychological issues.[6] Asking the question of what justice is and how it can be twisted.[7] Showing that you shouldn't rely on your talents too much and that regardless of how weird your quirks are you are like everyone else a human.[8] Things like you should think for yourself.[9] And even the topic of racism.[10] These are all examples of life lessons you can take from these artworks and there are probably many more.
[1] https://dr-stone.fandom.com/wiki/100_Stories and Dr. Stone episode 17
[2] "Snowwhite"
[3] "Goldilocks and the Three Bears"
[4] https://www.youtube.com/watch?v=J54FMA895OA
[5] "Rising of the Shield Hero"
[6] "Persona 4: The Animation"
[7] "Death Note"
[8] "Mob Psycho 100"
[9] "Psychopass"
[10] "GeGeGe no Kitarou"
![]() |
| Ill 1.: x0.25 vision, short kill distance ~GreenyNeko |
![]() |
| Ill 2.: x0.5 vision, medium kill distance ~GreenyNeko |
For all settings, I keep imposter and crewmate vision equal. First, I've tested if kill and view distance correlate, which wasn't the case. With this knowledge, I started the first round with x0.25 vision and short kill distance (see ill. 1). I continued with x0.5 vision and medium kill distance (see ill. 2). And lastly, x0.75 vision and long kill distance (see ill. 3). I didn't do any further checks since long is the highest kill distance option, and we already know that other settings don't affect it.
![]() |
| Ill 3.: x0.75 vision, long kill distance ~GreenyNeko |
Looking at the screenshots, we notice a relationship between the two distances. Namely, the kill distance is a bit smaller than the view distance. We could estimate the former to be x0.225, x0.45, and x0.675. The exact gap would require pixel measurements and determining the player's collision box. Unfortunately, the game scales with the device's resolution. Thus, requiring all screenshots on the same. I might do this at a later time. In particular, when I compare it to my estimate. For now, I am happy with this result.
A while ago, I got into speedrunning with one of the most popular games, Super Mario 64. Aside from the usual x-star categories, having watched some, you might have stumbled upon bingo. If you haven't, let me explain.
| Example Bingo Field for Super Mario 64 generated on https://www.speedrunslive.com/tools/sm64-bingo/ |
| Bingo field created by GreenyNeko on bingobaker.com |
[2] https://www.speedrunslive.com/tools/sm64-bingo/
[3] https://www.youtube.com/watch?v=X3DuqbqpSaY
[4] https://bingobaker.com#cfa78ff4d69fc7ed
![]() |
| Imposter vision hide-n-seek by GreenyNeko |
![]() |
| Voting in normal game by GreenyNeko |
Hide-n-Seek plays with only one imposter. With their view and kill distance set to a minimum, they have to find the crewmates and kill them. Crewmates get a head start and hide on the map. Players don't report bodies, don't call sabotages, and don't press the emergency button. The last person alive wins when the game ends. A variant of this has the players finish all tasks to win. Another changes the game's settings just a little bit to create a scarier atmosphere.[1]
![]() |
| Barely outside of imposter vision by GreenyNeko |
For this mode, the same rules as in Hide-n-Seek apply, but with some changes. First of all, sabotaging communications is allowed. Second, the player view distance now should be below x0.75 to improve the atmosphere. However, it should also be higher than the imposters' view to allow playing around them. I've noticed, when the view distance of the imposter and player is the same, it sometimes feels random to die. If imposter and crewmate view is equal, death seems random. Next up, players who die should stop talking, which helps the atmosphere to make you feel more alone as the game goes on. Switching off common-tasks is recommended since these encourage the imposter to wait for players on these. And lastly, I recommend playing on Skeld.[2]
We have a small map with narrow hallways and a maniac running around. Players with a limited field of vision going from crowded to alone filled with dead bodies. The gameplay is comparable to Dead by Daylight, where you need to do tasks to win while avoiding the murderer. Due to the increased view distance, you can outsmart them, saving you with a fast-beating heart. Best of all, this is a spooky experience for all ages! Though, this is honestly just a theory. I'll find it out on Halloween 2020 at 3 pm UTC on my stream. Let's see if I can get this post out before, haha. Happy Halloween!
[1] https://www.reddit.com/r/AmongUs/comments/gsm9mu/hide_and_seek_custom_mode/
[2] https://www.youtube.com/watch?v=HryURpJSN4o&t=1h11m14s
![]() |
| Among Us Skeld Map With Translation ~ by GreenyNeko |
![]() |
| Among Us German Acquisition Comic ~ by GreenyNeko |
Not every research has success, and I used not to post those. Combined with the limited time, having to learn for exams, I didn't write any. Thus, I'll start posting failed research as well. Since you can learn from fails too.
![]() |
| Screenshot of Mira HQ on Among Us Mobile With the "Y"-Tunnel circled and the door log marked ~ By GreenyNeko |
Mira HQ is a map in Among Us, that is famous for its Y-shaped-tunnel. Each exit of the tunnel has a sensor, triggering a log when a player passes it, but not when venting. As such, you can't read the imposter from the door logs should be possible. To prove this, we'll look at the Crewmates' sensor combinations and compare them to the possible Imposter combinations. Another question is if the imposter can counter this. But first, we'll organize the information in a useful way. Therefore removing unnecessary details and keeping the relevant (sensors, Crewmate/vent pathing, cardinal areas).
![]() |
| Ill. 1: Crewmate/Vent Pathing in Mira HQ ~by GreenyNeko |
We take the MIRA HQ map and draw in the paths between rooms, between vents, and the sensors. (see Ill. 1) However, we still have more information than needed. We only care about the sensors, so we reduce the paths to the north, south-west, and south-east. The result shows how players will trigger the sensors. (see. Ill. 2) From here on out, I will label south-west as west and south-east as east.
![]() |
| Ill. 2: Log Relevant Crewmate/Vent Pathingof Mira HQ ~by GreenyNeko |
Given the nodes on the crewmate path (shown in green), they can be west, east, north, or in the tunnel. Additionally, triggering sensors puts it on cooldown for the player. Thus doubling back causes only a single log, not two.
So, we get these combinations:
We read NWE as:
Doubling back makes the logs ambiguous. Thus, we can't tell the player's exact position or path.
We read NWWE as:
The imposter can use the pink and green paths. Ergo, all combinations we found so far count here too, as well as the ambiguity. But if you think a person vented, you can check the logs. Seeing an imposter in the west, but there is no recent combination of SW/NW, and they appear in the log, they vented. Unsuccessful research? We just solved it! Well, you can't tell the difference if the imposter vented and then double backed on the sensor at the target location. Especially since doubling back is not uncommon on sensors.
Since both imposters and crewmates produce the same log combinations, and imposters can hide venting through doubling back. Reading who vented isn't reliably with a good imposter.
I have planned two more blog posts on Among Us, and if you're interested, I got some research going on. It takes 30-40 minutes to complete.
It took me quite a while to understand how 8bit and 16bit palettes work.
To spare you the search, I've decided to write this guide.
Creating authentic 8bit and 16bit graphics requires understanding palettes. There are programs and algorithms, which transform your images into 8- or 16bit. Since algorithms cannot guess the intention behind the color choice and miss the context, creating them yourself is more flexible and results in higher quality. It also prevents the loss of details due to quantization. Additionally, to some, pixel-art is about control, and creating the palette gives such.
During the era of the Nintendo Entertainment System, the technology worked with 8bit. Therefore the color of a pixel is represented by eight ones or zeroes. Today a pixel carries up to 32. You might be familiar with the red, green, and blue or RGB, where we split a color into three components. However, dividing 8bits into three colors is ambiguous. That's why there are formats for palettes. RGB332 is the most common for 8bit. It means we assign 3 bits to each red and green, and two bits to blue. A lighter orange would be 111 100 01, which would be 7 for red, 4 for green, and 1 for blue. That's nearly 0, so almost black.
![]() |
| Comparing the colors. Left: Black; Right: Our Orange |
Better idea: We map each RGB value onto a level.
For example, let's map the following blue levels:
00 -> 0
01 -> 79
10 -> 155
11 -> 255
The color levels (right-hand side) the bits map to is our palette. Back then, hardware limited us to use one palette for all drawn on the screen at the same time. Years later, the Super Nintendo Entertainment System was released. Powered by 16bit, our capabilities increased immensely! A typical format for 16bit is RGB565. Today we use 24bit ("true-color") and the RGB888 format. Some formats use RGBA, followed by four numbers, where A (="alpha") stands for the transparency.
Side note: The sum of the numbers does not need to add up to the number of available bits. Ergo RGB333 is a valid format for 16bits.
Using preexisting colors to create a palette takes three steps. First, choose a format. Then add them to your palette.
Let's use the following colors for an 8bit palette of the format RGB332:
|
|
| ||||
| 0 | 0 | 0 | |||
| 212 | 211 | 198 | |||
| 255 | 255 | 255 | |||
| 248 | 216 | 198 | |||
| 248 | 197 | 198 | |||
| 232 | 173 | 159 | |||
| 97 | 99 | 43 | |||
| 117 | 234 | 73 |
The format gives us 3 bits for red and green and 2 bits for blue. The formula for the number of representable levels is 2bits. That is enough for 23 = 8 levels of red and green each and 22 = 4 levels of blue. However, our colors have six unique levels of blue (0, 43, 73, 159, 198, 255). Therefore we can't represent all eight colors.
Quantization, the third step, will help us here. For this one, we'll merge close color levels.
Our two colors:
248 red, 216 green, 198 blue 232 red, 173 green, 159 blue
will then (for example) become:
248 red, 216 green, 198 blue 232 red, 173 green, 198 blue
By choosing a good looking and distinguishable color level, we can optimize this better than an algorithm. Then we continue adding all needed colors and quantify them to our palette. Now with our palette created, we can color the pixel art.
Reminder: In 8bit and 16bit video games, everything on-screen at the same time uses one palette. Therefore use the same palette for all associated sprites.
The difference between darker colors is harder to notice. Thus use less dark color levels.
![]() |
| Senko Pixel Art, 16Bit Palette (RGB565) drawn by GreenyNeko |
This pixel art of Senko uses an RGB565 palette with the following color levels:
| Color | 1 | 2 | 3 | 4 | 5 | 6 | 7 | 8 | 9 | 10 | 11 | 12 | 13 | 14 | 15 | 16 | 17 | ... | 32 | |
| Red | 0 | 97 | 126 | 155 | 174 | 197 | 205 | 212 | 222 | 227 | 232 | 248 | - | - | - | - | ||||
| Green | 0 | 46 | 54 | 60 | 83 | 99 | 106 | 163 | 173 | 188 | 197 | 207 | 211 | 216 | 224 | 234 | 255 | ... | - | |
| Blue | 0 | 43 | 48 | 60 | 73 | 88 | 93 | 101 | 118 | 159 | 175 | 198 | 236 | 255 | - | - |
Notice that there's still space in the palette marked by the "-"s.
![]() |
| Senko Pixel Art, 8Bit Palette (RGB332) drawn by GreenyNeko |
This one uses an RGB332 palette with the following color levels:
| Color | 1 | 2 | 3 | 4 | 5 | 6 | 7 | 8 |
| Red | 0 | 97 | 126 | 155 | 174 | 197 | 212 | 248 |
| Green | 46 | 83 | 106 | 156 | 173 | 197 | 216 | 234 |
| Blue | 43 | 106 | 175 | 198 |
![]() |
| Non-natural input on smart-phone. https://pixabay.com/photos/game-play-mobile-game-android-game-4622800/ |